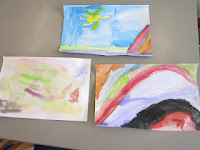
After last week's struggle with mixing colours using crayons, I decided to let the children try a variation of the exercise using temperat paint. The first exercise was more structured in the sense that a template was given for the children to fill in, so that they get an idea of how the different primaries work together.
Then we tried out a still life painting that continued the exercise on colour gradation. I place several ripening mangoes in the middle of the tables for the children to paint, all the while reminding them to apply their knowledge of colour gradation and mixing.
This post is linked up to several blog hops, where you can see what other homeschoolers have been busy with.
Friday, 29 June 2012
Wednesday, 27 June 2012
Walking with Robots
Following the introductory robotics class a few weeks ago, the children are now ready to examine slightly more complex robots. They went straight on to assemble a scissors-like robot with motors attached to the ends of its two legs.
Using switches, they then learn to make the robot walk under manual control.
IQ chips are the introduced which the children programmed so that the robot could walk by itself.
Tiger and his team mate were most pleased when they succeeded in getting their robot to walk autonomously, through the correct programming.
Of course, there has got to be a robot race before the end of class!
This post is linked up to several blog hops, where you can see what other homeschoolers have been busy with.
Friday, 22 June 2012
Art class: Colour wheels
A slight variation on colour mixing this week, with a bit of revision thrown in. I wanted the children to see for themselves the effects of colour mixing using a dry medium (crayons) so that they would not think only wet medium is capable of being mixed, so I gave them a simple colour wheel to fill in.
After learning about the Primary and Secondary colours, the children now learned about Intermediary colours. I explained that, in simple terms, intermediary colours are just different shades of secondary colours that are created by uneven proportions of two primary colours.
The children then got on with their exercise. Admittedly, trying to create the different shades is very difficult to do with crayons, but the children did the exercise in good stride.
This post is linked up to several blog hops, where you can see what other homeschoolers have been busy with.
Wednesday, 20 June 2012
Mechanical toys
This week we learned how to design, operate, and build a mechanical toy.
First, the children were introduced to the various cam mechanisms and about controlling movement with a cam mechanism as part of a simple toy.
This was followed by the workshop leader demonstrating a cam-operated toy and asking the children to describe how it worked. A computer simulation was then used to demonstrate the effect of different cam shapes.
After that, the children were tasked to design and make their own toys from cardboard based on the mechanical knowledge they learned from the lecture and demonstration.
This post is linked up to several blog hops, where you can see what other homeschoolers have been busy with.
Friday, 15 June 2012
Art Class: Colour mixing
In this class I introduced the first element, Colour. I talked to the children about the Primary colours and how they can be mixed to make the Secondary colours. This was followed by a demonstration on paper of how colour mixing is done.
Then the children had a go at this exercise as well, using a limited palette of red, yellow, and blue.
The second half of the class was a little improvisation exercise based on the same colour-mixing theme. I asked the children to fold their paper in half, paint on one-half, fold and rub their paint to create a symmetrical design. When the paint has dried, they could cut them into interesting shapes. I did a quick demo using a butterfly shape, and some of the children decided that they wanted the same.
This post is linked up to several blog hops, where you can see what other homeschoolers have been busy with.
Wednesday, 13 June 2012
Robotics - the beginning
I am becoming more convinced about the interconnectedness of the different "areas" in science, and this realisation is going to affect how we approach science for Year 3, but more about that in a later post on my plans for Year 3.
I arrived at the conclusion about science (and how it can be approached) by observing how Tiger has been enjoying the classes and actually understanding the concepts that were covered. For example, the latest class was about robotics and circuits, two area that I did not expect us to cover until a few years from now.
First the class was introduced to the very basic components of codes, circuits, mechanics, and robots.
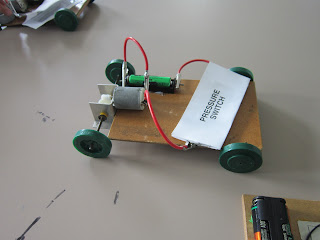
Working in pairs, children then made pressure switches which switch on when a weight is put on them.
The switches were tested using a circuit board and then placed on an electric buggy (the robot). The robot was connected so that it could only move if the switch were loaded with its weight.
The children then ran ‘robot relay races’ using these in which the baton (the weight) was transferred from one buggy to another.
The experiments and results were recorded in a workbook.
After that, the class was presented with six tasks of increasing difficulty -- the most difficult task of all was to make the robot move backwards and forwards between two barriers automatically.
This post is linked up to several blog hops, where you can see what other homeschoolers have been busy with.
Saturday, 9 June 2012
The Franks
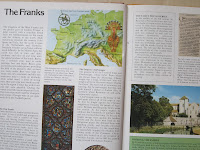
From the various sources of historical readings (I am not able to keep up with all the different books that Tiger has been reading on his own), Tiger has known about the Franks even before we started on this topic. They first came onto our radar with the Fall of Rome by the various barbarian tribes, of which the Franks was considered one.
We watched two documentaries to get an overview of the Franks:
1) Barbarians - The Franks
2) The Franks
Then we looked at a few books to figure out their origin and the route they took for their eventual conquest of a large part of Europe:
Charlemagne was a prominent figure in this part of European history, hence an overview of him worked nicely as an introduction to the second part of the Frankish history, the first part being about how Clovis (Charlemagne's grandfather) consolidated power to build his dynasty.
To understand more of what happened during this period, we also watched the following documentary:
Tiger rounded the topic off by reading two historical fictions on this subject:
This post is linked up to several blog hops, where you can see what other homeschoolers have been busy with.
Friday, 8 June 2012
Art class: Watercolour painting
I introduced watercolour painting to the children this week. Most of the children in class would have had some kind of exposure to painting, but not necessarily with watercolour paints. Before I let the children loose with the paint sets, I showed them: (1) the different types of brushes, and (2) how to take care of their brushes by demonstrating a sensible way to clean and dry their brushes.
After they have practised that for a few times, I showed the children the different ways of mark-making using a single, mid-sized synthetic brush, as well as different ways to create a wash, which also introduces them to the idea of colour mixing.
The children enjoyed creating their pieces and experimenting with the different ways of using their brushes and paints.
For some of the children in the class, this was the first time they have worked with watercolour. The spontaneity and exuberance of their art work can be seen in the samples below:
This post is linked up to several blog hops, where you can see what other homeschoolers have been busy with.
Wednesday, 6 June 2012
Building bridges
The second of our physics class was on the topic of bridges. It started with a discussion about the various types of bridges and the people involved in designing bridges.
The workshop leader then demonstrated the experiment that the children were to do, which was to test the material to be used for making their bridge; in this case straws. The test was carried out by measuring and recording the weight that a given number of straws can support over a span of 10 cm.
Results from the hands-on experiment were plotted on a graph. The graph was then used to plan how many straws would be needed to build a bridge with a greater span which could support a given weight. Their design was then built and tested.
This post is linked up to several blog hops, where you can see what other homeschoolers have been busy with.
Saturday, 2 June 2012
Art class: Elements
When the "co-op" mothers knew that I have some knowledge of art, they were very keen for me to teach the children on a regular basis. The timing ties in well with the activities that Tiger participates in with them so I agreed to take it on, both as a service to the group that we have become very fond of as well as for us to expand our homeschooling social network.
The little art class has about 20 children, ranging from 5 to 10 years old. Tiger attends the class too (hence we are taking a break from our Artist Study at home). We meet each week to learn about the elements of art in a structured way -- with a mix of theory, demonstrations, and practical activities.
Since the children have varied degrees of prior exposure to art, I decided to start the first session with them by leveling off everyone's expectations (of themselves and of what the class is about) by introducing what art is, how each artist is different, how there are many different ways to interpret and express art.... Essentially, what I hope to achieve with this class is:
The second half of the lesson was for the children to draw whatever they want using at least one of the elements.
This post is linked up to several blog hops, where you can see what other homeschoolers have been busy with.
The little art class has about 20 children, ranging from 5 to 10 years old. Tiger attends the class too (hence we are taking a break from our Artist Study at home). We meet each week to learn about the elements of art in a structured way -- with a mix of theory, demonstrations, and practical activities.
Since the children have varied degrees of prior exposure to art, I decided to start the first session with them by leveling off everyone's expectations (of themselves and of what the class is about) by introducing what art is, how each artist is different, how there are many different ways to interpret and express art.... Essentially, what I hope to achieve with this class is:
- to introduce the children to the basic building blocks of visual art;
- to teach them basic techniques that they can apply for themselves at home;
- to help them express themselves; and
- to help them gain confidence in themselves through the process of making art.
The second half of the lesson was for the children to draw whatever they want using at least one of the elements.
This post is linked up to several blog hops, where you can see what other homeschoolers have been busy with.
Subscribe to:
Comments (Atom)


